目标定义

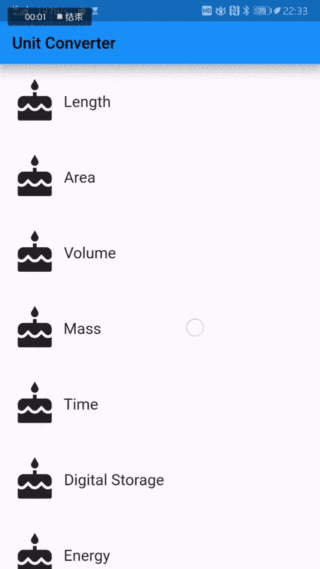
通过第一个 Codelabs 上手 Flutter 开发。以下是第一个项目的演示:

avatar

CodeLabs 分析

功能分析

  • 点击响应:点击出现 水墨化效果
  • 横竖屏自适应

界面分析

按照从内到外的顺序,分析应用程序需要的组件以及组合形式。这里可以把每一行封装为一个组件,然后复用组件代码,实现列表应用。

avatar

自定义组件开发

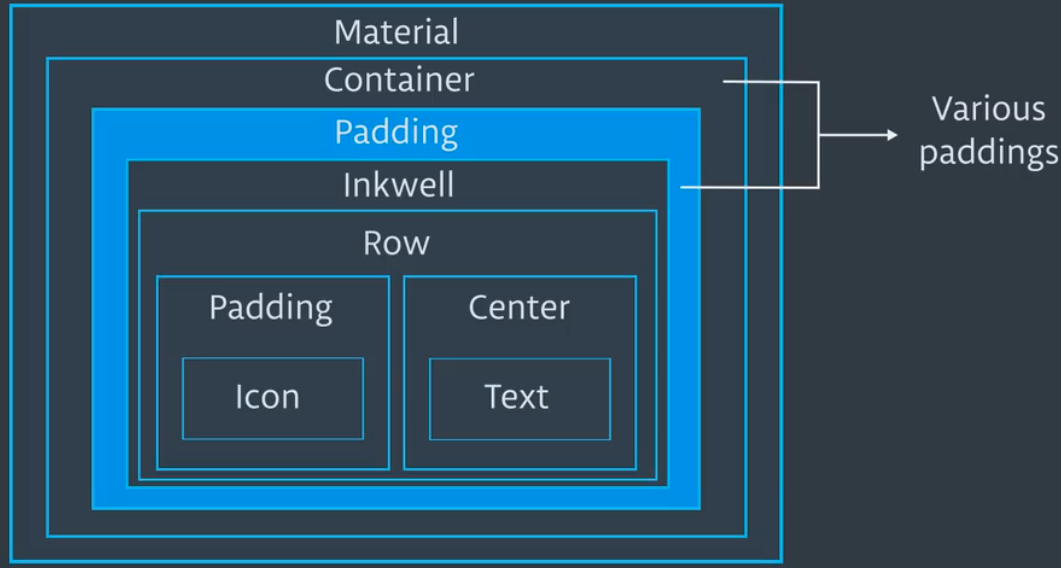
创建 category.dart,新建一个 ItemRow 的类,用来表示一个 ICON 和一个 TEXT

  • Flutter 组件有两种: 有状态组件无状态组件。组件通过直接继承 StatelessWidgetStatefulWidget 这两个抽象类来创建(class ItemRow extends StatelessWidget)。

  • 和多数面向对象程序设计语言一样,组件中需要使用的参数都需要提前申明,每个参数对应一个 final 修饰的属性。组件构造方法里面的命名参数可以使用 @required 注解为必需参数。另外语法规范还规定了,第一个参数是 key ,最后一个参数是 childchildren 或其他类似参数。

  • 通过使用 assert 来保证当所指定的参数没有被赋值时,出现报错。一来这就省去了在创建组件的时候,需要给参数赋初值,二来提醒使用组件者,必须传入必要参数。

  • 通过覆盖 build 这个抽象方法描述由此控件所实现的那一部分用户界面。其中,抽象类 BuildContext 是该控件在控件树中的位置句柄。

1
2
3
4
5
6
7
8
9
10
11
12
13
14
15
16
17
18
19
20
21
22
23
24
25
26
27
28
29
30
31
32
33
class ItemRow extends StatelessWidget {
final IconData iconLocation;
final String name;

const ItemRow({
Key key,
@required this.iconLocation,
@required this.name,
}) : assert(iconLocation != null),
assert(name != null),
super(key: key);

Widget build(BuildContext context) {
// TODO: implement build
return Row(
children: <Widget>[
Padding(
padding: EdgeInsets.all(8),
child: Icon(
iconLocation,
size: 60.0,
),
),
Center(
child: new Text(
name,
textAlign: TextAlign.center,
style: Theme.of(context).textTheme.headline,
),
),
);
}
}

然后按照设计,用 PaddingInkWell 组件包裹上面创建的组件,使得构成一个完整的 Category 组件

1
2
3
4
5
6
7
8
9
10
11
12
13
14
15
16
17
18
19
20
21
22
23
24
25
26
27
28
29
30
31
32
33
34
35
36
class Category extends StatelessWidget {
final IconData iconLocation;
final String name;
final Color color;

const Category({
Key key,
@required this.iconLocation,
@required this.name,
@required this.color,
}) : assert(iconLocation != null),
assert(name != null),
assert(color != null),
super(key: key);

Widget build(BuildContext context) {
return Container(
height: 100.0,
child: InkWell(
highlightColor: color,
splashColor: color,
borderRadius: BorderRadius.circular(40),
onTap: () {
print("I was tapped: " + name);
},
child: Padding(
padding: EdgeInsets.all(8.0),
child: ItemRow(
iconLocation: iconLocation,
name: name,
),
),
),
);
}
}

自定义页面开发

组件开发完后,就要用自定义的组件,创建一个完整的页面了。在 Fluter 中,页面被称为 Route。当然在 Flutter 中万物皆为组件,所以一个页面其实也就是创建一个组件。

1
2
3
4
5
6
7
8
9
10
11
12
13
class CategoryRoute extends StatelessWidget {

const CategoryRoute();

@override
Widget build(BuildContext context) {

return Scaffold(
appBar: AppBar(),
body: Container(),
);
}
}

这里用到了一个 FLutter 布局组件 Scaffold官方示例
这里主要用到了 appBarbody两个属性。appBar 显示在界面顶部的一个 AppBarbody 用来在显示页面的主要内容。

首先创建 body 要显示的组件:

1
2
3
4
5
6
7
8
9
10
11
12
13
14
15
16
17
18
Widget _buildCategoryWidgets(List<Widget> categories) {
return OrientationBuilder(
builder: (BuildContext context, Orientation orientation) {
if (orientation == Orientation.portrait) {
return ListView.builder(
itemBuilder: (BuildContext context, int index) => categories[index],
itemCount: categories.length,
);
} else {
return GridView.count(
crossAxisCount: 2,
childAspectRatio: 3,
children: categories,
);
}
},
);
}
  • 这里传入一个 List 用来存放所有要显示的我们之前自定义的 category 组件。

  • 这里使用 OrientationBuilder 这个小部件,在设备的方向发生改变的时候,重新构建布局。主要是通过 orientation 这个参数是 Orientation.landscape 还是 Orientation.portrait 来区别横屏还是竖屏。具体参考这篇文章

创建好 body 后,定义变量,然后在 Scaffold 内调用即可。

1
2
3
4
5
6
7
8
9
10
11
12
13
14
15
16
17
18
19
20
21
22
23
24
25
26
27
28
29
30
31
32
33
34
35
36
37
38
39
40
41
42
43
44
45
46
static const _categoryNames = <String>[
'Length',
'Area',
'Volume',
'Mass',
'Time',
'Digital Storage',
'Energy',
'Currency',
];

static const _baseColors = <Color>[
Colors.teal,
Colors.orange,
Colors.pinkAccent,
Colors.blueAccent,
Colors.yellow,
Colors.greenAccent,
Colors.purpleAccent,
Colors.red,
];

@override
Widget build(BuildContext context) {
// TODO: Create a list of the eight Categories, using the names and colors
// from above. Use a placeholder icon, such as `Icons.cake` for each
// Category. We'll add custom icons later.
final categories = <Category>[];
for (var i = 0; i < _categoryNames.length; i++) {
categories.add(Category(
iconLocation: Icons.cake,
name: _categoryNames[i],
color: _baseColors[i],
));
}

// TODO: Create a list view of the Categories

// TODO: Create an App Bar
final appBar = AppBar(title: Text('Unit Converter', style: TextStyle(color: Colors.black,fontSize: 25.0),),elevation: 10.0,);

return Scaffold(
appBar: appBar,
body: _buildCategoryWidgets(categories),
);
}

最后在 main.dart 调用即可。