
Windows 10 下安装 Arduino IDE
首先在下载地址下载安装下载地址
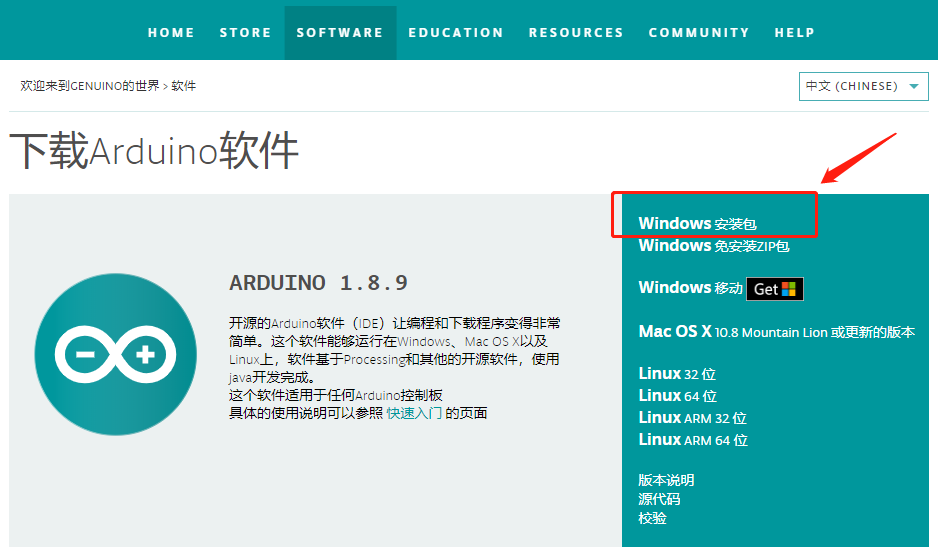
下载完成后双击运行,然后一路确定。如果出现提示是否安装驱动记得选安装。
Ubuntu 18.04 下安装 Arduino IDE
首先在下载地址下载安装下载地址
下载完整后,解压然后移动到你希望存放软件的路径中,然后运行软件内的 install.sh 进行安装
1 | cd arduino-1.8.9 |
然后你可以在你的开始菜单找到安装好的软件
下载开发板
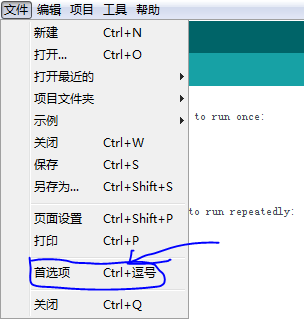
Arduino IDE 官方提供可下载的开发板有限,对于 ESP32 、 NodeMCU 这些板子,需要单独添加开发板下载地址。在菜单栏找到 文件-首选项-设置:
会看到下面这个弹出窗口:
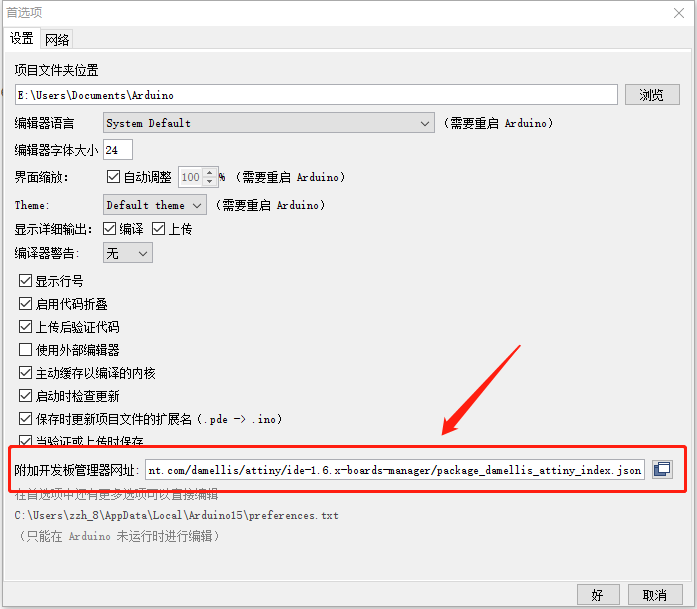
我一般用到的是以下这么几个:
1 | https://github.com/espressif/arduino-esp32.git, |
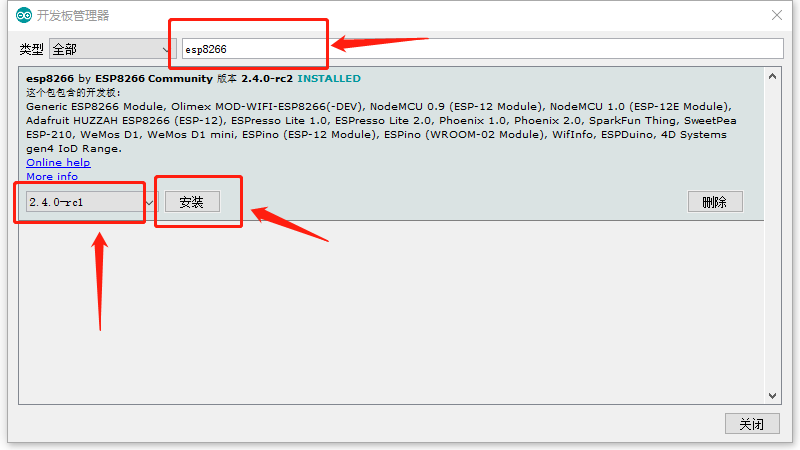
上面的配置完成后,就可以在 开发板管理 里面搜到配置的开发板了。打开 工具->开发板->开发板管理器 等待索引完成后,输入需要的开发板,比如: esp8266 进行搜索,然后选择需要的固件,比如: esp8266 by ESP8266 Community 安装即可:
安装驱动(Mac 用户和 Ubuntu 用户直接跳过)
很多板子,比如:Node MCU V0.9 和 Node MCU V1.0 都是通过串口通信协议把编译好的 Arduino 程序烧进板子里的,这也就是为什么烧写的时候不能打开串口,并且如果烧写的时候占用了串口的引脚会出错的原因。但是板子连接计算机用的是 USB 的口子,多数 Linux 系统发行版和 MAC 系统都是内置支持 USB to UART, Windows 并没有内置支持,但是当接入 USB 设备的时候,会自动安装驱动程序。也就是说正常情况下,你可以跳过本步骤。然而如果计算机不是一个充满了未知的东西,那不知道该少了多少乐趣。所以本人就遇到的驱动程序没有自动安装的情况,需要用下面的方法安装:
- 打开 Windows 的设备管理器,找到你的设备,然后使用自动搜索安装驱动的服务。如果不OK请继续往下看,OK了本步完成,可以愉快地玩耍了
- 下载驱动:下载地址,根据系统选取合适的版本号下载
- 打开下载的驱动
- 根据系统位数选择安装 32位,还是 64位
- 温馨提示:安装驱动有弄炸系统的风险,定时备份系统是个好习惯
Hello World
配置环境的最后一步,总是使用 Hello World 程序来测试下环境配置是否出现问题,这里可以随便找一个示例程序测试下:
首先打开示例程序,比如下面这个:
1 | // digital pin 2 has a pushbutton attached to it. Give it a name: |
然后选择开发板,比如 ESP8266:

使用 USB 连接计算机,点击右上角的烧写按钮开始编译烧写,最后打开串口监视器查看即可